



Getting CD cover dimensions right to look professional with your music release
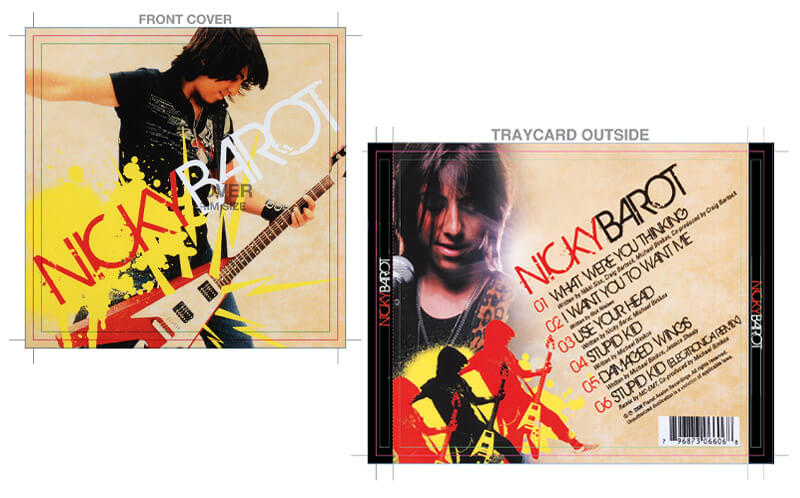
Long before someone hears your music, they see your CD cover. That cover has to immediately show off your professionalism and style. If it's sloppy, poorly formatted, or rushed, no matter how good the music is, it tells the listener: "An amateur did this."
Unfortunately, one of the biggest mistakes independent artists make is getting CD cover dimensions wrong. The wrong size works like a domino effect that cascades into other parts of the project as well: blurry images, cropped designs, or text that gets cut off during printing.
Thankfully, it's easy to avoid these common pitfalls once you know how CD cover dimensions work and understand how to prepare your CD cover art for manufacturing. Here's what to know to make your CD cover art look as premium as possible.
Make your release look retail-ready
Although streaming dominates how we consume music today, CDs are still extremely popular at live shows, in merchandise stores, and among fans who enjoy having a physical copy of the music they love. A professionally designed CD package can transform your music from something homemade to something that looks retail ready.
However, if you're new to graphic design or printing, you may be surprised to know just how exacting and precise the process is. Text can get cut off, white borders can appear where color should reach the edges, or images can look pixelated or blurry. Oftentimes these issues can be resolved simply by using the correct template and preparing your CD artwork by following a few step-by-step directions.

Standard CD cover dimensions
The most common type of CD packaging is the standard jewel case. This is the classic plastic CD case used in retail stores for decades starting in the 1990s. Each part of the packaging has its own sizing and dimensions, so the artwork needs to fit those parts accordingly. Here's what you need to know:
Front cover (booklet cover)
The front cover is typically part of a booklet that's inserted in the jewel case. The standard size of the front cover is:
4.724 inches x 4.724 inches or 120mm x 120mm.
If the booklet contains multiple pages, each page includes that same square dimension.
Back cover (tray card)
The tray card is what sits behind the clear plastic tray on the back of the jewel case. It usually includes your track list, credits, barcode, and copyright information.
The standard size for the tray card is:
5.906 inches x 4.646 inches or 150mm x 118mm.
Keep in mind that the design also needs to include the narrow side panels that fit into the jewel case spine.
Spine text area
The spine generally includes the artist's name and album title so that it's easy to identify and sort the CDs when stored on shelves. Because the spine is extremely narrow, you should use a simple, readable font.
At Disc Makers, we provide packaging guides and templates to help you or your graphic artist design your CD cover artwork correctly right from the start.
About bleed, trim, and safe areas
Understanding bleed and trim lines can be one of the more confusing parts about CD cover dimensions. It's important to understand what these technical parts are and how they work so that your design prints cleanly.
Bleed area
The bleed area is the extra artwork that extends beyond the final trim size. This makes sure that your color or background images reach the edge of the page after they're cut. Without it, you might see small white edges during the trimming process.
Most CD artwork requires a ⅛ inch (0.125") bleed on all sides. That means your design should extend slightly behind the final dimensions.
Trim line
The trim line marks where the artwork will be cut when your CD cases are printed. Anything outside the trim line will be removed.
Safe area
The safe area is where critical elements in your CD cover artwork should stay. Text, logos, and any important visual elements need to stay inside this zone so that they don't accidentally get trimmed. Disc Makers templates include these guides automatically so there's less guesswork, even if you're new to designing your own CD cover art.
Resolution and file formats
Even if the CD cover dimensions are correct, artwork can still look unprofessional and "homemade" if the resolution is too low. For print, images need to be much higher resolution than digital graphics used online. The industry standard is 300 DPI. DPI stands for dots per inch, and this makes sure that the artwork looks crisp and sharp when printed.
Digital graphics created for the web and social media are usually around 72 DPI. If those files are reused or enlarged for CD printing, they'll look blurry or pixelated. Always create artwork at 300 DPI or higher from the start.
When you're ready, it's time to prepare your CD cover files for printing. We accept several formats, including:
- PDF (Print-ready PDF/X-4-2008) strongly recommended
- Native design files including AI, PSD, INDD
- High-resolution TIFF/JPEG files if using Disc Makers design services
Be sure that all images are 300 ppi, fonts are embedded and color has been converted to CMYK color mode.
Taking the time now to understand CD cover dimensions, bleed areas, resolution requirements and printing guidelines makes sure your artwork looks exactly as intended once it goes into production. Take the time to get it right and make sure that your music doesn't just sound great, but looks the part too. Get started with a free quote from Disc Makers today.
TLDR
Getting CD cover dimensions right is essential for making your music release look professional. Even small sizing mistakes can lead to blurry images, cropped text, or printing issues that make your project feel low quality. Standard CD packaging like jewel cases will have specific dimensions for the front cover, tray card, and spine, and each must be followed for proper fit. Understanding technical elements like bleed, trim, and safe areas ensures your artwork prints cleanly without unwanted white edges or cut-off text. Resolution also plays a key role, with 300 DPI being the standard for sharp, print-ready images. Using proper file formats and templates helps avoid common mistakes. By taking the time to follow these guidelines, you can ensure your CD packaging looks polished, professional, and ready for retail or distribution.